On this page (9)
- 01Step 1: make a key and put it on the server
- 02Step 2: prove the key works, and keep that session open
- 03Step 3: turn off password login (and check the drop-in folder)
- 04Step 4: UFW in the right order
- 05Docker ignores UFW for published ports
- 06If you did lock yourself out
- 07What to look at next
- 08Keep an eye on it
- 09FAQ
A fresh VPS usually comes with SSH open to the world and passwords allowed. Within minutes of it getting a public IP, bots start trying passwords on port 22. Two changes stop almost all of that: log in with a key instead of a password, and put a firewall in front of everything you didn't mean to publish. Both are ten-minute jobs. Both can also lock you out of your own server if you do them in the wrong order.
This is the order that doesn't lock you out.
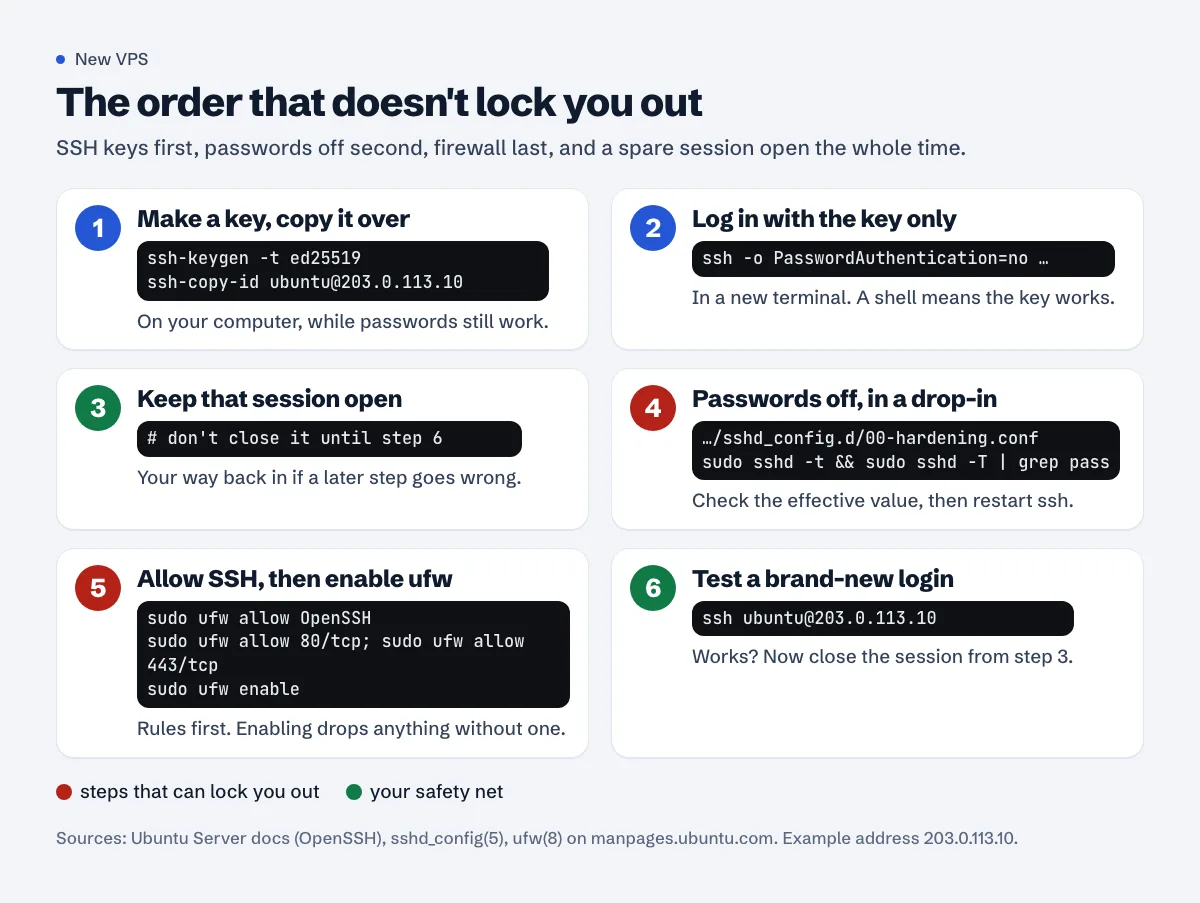
Step 1: make a key and put it on the server
On your own computer, not the server:
ssh-keygen -t ed25519 -C "laptop-2026"
Accept the default path, and set a passphrase. Ubuntu's OpenSSH server docs recommend ed25519 "due to shorter key size and lower computational requirements". Then copy the public half to the server while password login still works:
ssh-copy-id ubuntu@203.0.113.10
Use whatever user you log in as (root on many VPS providers, ubuntu on Ubuntu cloud images). If ssh-copy-id isn't available on your machine, paste the contents of ~/.ssh/id_ed25519.pub as a new line into ~/.ssh/authorized_keys on the server. Ubuntu's docs also say to make sure the file isn't group- or world-writable: chmod go-w ~/.ssh/authorized_keys.
Step 2: prove the key works, and keep that session open
Open a new terminal and force key-only login:
ssh -o PasswordAuthentication=no ubuntu@203.0.113.10
If that gets you a shell, the key works. Leave this session open until you finish. It's your way back in if a later step goes wrong: restarting sshd doesn't close sessions that are already open. (ufw's man page does warn that enabling it "may drop existing connections", which is why the provider's web console, covered at the end, is the last fallback.)
Step 3: turn off password login (and check the drop-in folder)
Here's the trap. On Ubuntu, /etc/ssh/sshd_config starts with an Include line for /etc/ssh/sshd_config.d/*.conf, and Ubuntu's docs say settings in that folder take precedence over the main file. The sshd_config man page explains why: "for each keyword, the first obtained value will be used", and included files are read in lexical order.
On many Ubuntu installs that folder already holds 50-cloud-init.conf with PasswordAuthentication yes, written by cloud-init's ssh_pwauth setting. Ubuntu bug #2088207 is people discovering exactly this: they set PasswordAuthentication no in sshd_config, restart, and passwords still work. If cloud-init itself reports an error on that server, cloud-init failed explains how to read it.
So look first:
sudo grep -riE '^\s*(passwordauthentication|kbdinteractiveauthentication|permitrootlogin)' /etc/ssh/sshd_config /etc/ssh/sshd_config.d/
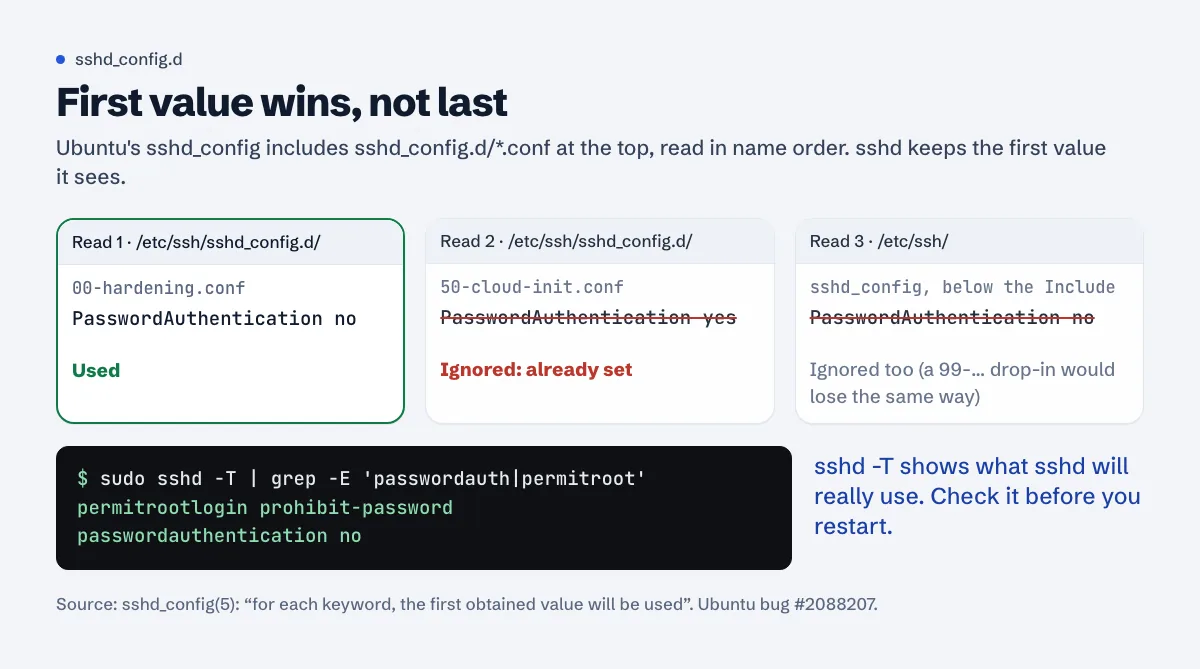
00-… beats 50-cloud-init.conf; a file named 99-… loses to it.Then put your settings in a drop-in whose name sorts before 50-cloud-init.conf. A lot of advice says to use a high number "so it's read last". With sshd that's backwards: last loses.
sudo tee /etc/ssh/sshd_config.d/00-hardening.conf >/dev/null <<'EOF'
PasswordAuthentication no
KbdInteractiveAuthentication no
PermitRootLogin prohibit-password
EOF
prohibit-password is already the default for root (the man page lists it as "The default is prohibit-password"), but writing it down makes it visible. If you log in as a normal user with sudo, use PermitRootLogin no. You can also change the line in 50-cloud-init.conf to no, or set ssh_pwauth: false in your provider's user-data for future servers (cloud-init set passwords module).
Test the config, then ask sshd what it will actually use:
sudo sshd -t
sudo sshd -T | grep -E 'passwordauthentication|kbdinteractiveauthentication|permitrootlogin'
sshd -t prints nothing if the syntax is fine. sshd -T prints the effective values, after every include. You want:
permitrootlogin prohibit-password
passwordauthentication no
kbdinteractiveauthentication no
Only then restart, using the command from Ubuntu's docs:
sudo systemctl restart ssh.service
From a third terminal, confirm passwords are refused:
ssh -o PubkeyAuthentication=no ubuntu@203.0.113.10
ubuntu@203.0.113.10: Permission denied (publickey).
(publickey) at the end means the server now offers keys only.
Step 4: UFW in the right order
ufw's man page: "On installation, ufw is disabled with a default incoming policy of deny, a default forward policy of deny, and a default outgoing policy of allow." So the moment you enable it, everything inbound that has no rule is dropped, including SSH. The same page notes that "ufw does support adding rules before enabling the firewall". That's the whole trick: rules first, enable second.
sudo ufw default deny incoming
sudo ufw default allow outgoing
sudo ufw allow OpenSSH
sudo ufw allow 80/tcp
sudo ufw allow 443/tcp
sudo ufw enable
OpenSSH is an application profile that ships with the SSH server (sudo ufw app list shows the profiles you have). If you moved SSH to another port, allow that port instead, for example sudo ufw allow 2222/tcp, before you enable.
When you run enable over SSH, ufw asks first:
Command may disrupt existing ssh connections. Proceed with operation (y|n)? y
Firewall is active and enabled on system startup
Check what you ended up with:
sudo ufw status verbose
Status: active
Logging: on (low)
Default: deny (incoming), allow (outgoing), deny (routed)
New profiles: skip

To                         Action      From
--                         ------      ----
22/tcp (OpenSSH)           ALLOW IN    Anywhere
80/tcp                     ALLOW IN    Anywhere
443/tcp                    ALLOW IN    Anywhere
22/tcp (OpenSSH (v6))      ALLOW IN    Anywhere (v6)
80/tcp (v6)                ALLOW IN    Anywhere (v6)
443/tcp (v6)               ALLOW IN    Anywhere (v6)
Now open one more new terminal and log in. If it works, you can close the safety session from step 2.
Two optional extras. sudo ufw limit OpenSSH replaces the plain allow with a rate limit; ufw "will deny connections if an IP address attempts to initiate 6 or more connections within 30 seconds". Useful, but with keys only, the guessing already goes nowhere. And if you have a static IP at home or the office, you can allow SSH from that address only (sudo ufw allow from 198.51.100.7 to any port 22 proto tcp), but keep your provider's web console in mind for the day your IP changes.
Your provider may also offer a cloud firewall in its panel. That's a separate layer in front of the server; if a port is open in ufw but closed there, it's still closed.
Docker ignores UFW for published ports
This catches nearly everyone who runs Docker on a ufw box. From Docker's packet filtering and firewalls page: "Docker and ufw use firewall rules in ways that make them incompatible with each other", and "When you publish a container's ports using Docker, traffic to and from that container gets diverted before it goes through the ufw firewall settings."
So docker run -p 8080:80 … or ports: - "8080:80" in Compose makes port 8080 reachable from the internet, even though ufw status says nothing about it. Docker's port publishing docs put it bluntly: "Publishing container ports is insecure by default."
The fix when nginx or another proxy sits in front: publish on loopback only. Docker: "If you include the localhost IP address (127.0.0.1, or ::1) with the publish flag, only the Docker host can access the published container port."
ports:
  - "127.0.0.1:8080:80"
Check what's listening and on which address:
sudo ss -tlnp
A line with 0.0.0.0:8080 or [::]:8080 is public. 127.0.0.1:8080 is local only. Databases are the ones to worry about: a MySQL or Redis container published on 0.0.0.0 is reachable by anyone.
If you did lock yourself out
Every VPS provider has a web console (VNC, serial or "recovery console") that doesn't go through SSH or the firewall. Log in there with the user's password (or reset it in the panel), then undo the last step: sudo ufw allow OpenSSH if it was the firewall, or move the drop-in aside (sudo mv /etc/ssh/sshd_config.d/00-hardening.conf /root/) and restart ssh if it was the key. Then go back to step 2.
What to look at next
A locked-down SSH stops password guessing; it doesn't touch your web apps. fail2ban for WordPress and SSH covers the login form, and CUPS port 631 open on a server is a good example of a port nobody meant to publish. If ss showed you something odd, that guide's checks apply to any port. For the site side, security headers for blogs is the browser-facing half.
Keep an eye on it
The Approvalens server agent checks once an hour whether SSH accepts passwords or root logins and whether a firewall is on, and e-mails you when a new listening port appears.
FAQ
I set PasswordAuthentication no and passwords still work. Why?
A file in /etc/ssh/sshd_config.d/ sets it to yes and is read before your line. Run sudo sshd -T | grep passwordauthentication to see the effective value, then put your setting in a drop-in that sorts first, such as 00-hardening.conf.
Should I move SSH off port 22?
It cuts log noise from bots that only try 22. It isn't protection by itself; keys are. If you do move it, allow the new port in ufw and your provider's firewall before restarting ssh, and test it in a new session.
Do I need ufw if my provider has a cloud firewall?
One working firewall is the minimum. ufw is handy because it travels with the server and you can check it from the shell. Remember that neither stops Docker-published ports unless you bind them to 127.0.0.1 (for ufw) or close them at the provider.
Is it safe to run ufw enable over SSH?
Yes, if you ran sudo ufw allow OpenSSH (or your custom port) first. ufw warns you when you're connected over SSH. Without the allow rule, new SSH connections are dropped as soon as it's enabled.
Spotted something out of date or wrong? Tell us and we'll correct it.
Read this guide in Turkish →Free scan
Check your own site
The free scan reads the first 50 pages and shows your score and every problem it finds.