Fail2ban reads your logs, counts failures per IP address, and adds a firewall rule that blocks an address once it crosses a limit. That's all it does, and it's worth being clear about it from the start. The project's own README says: "Though Fail2Ban is able to reduce the rate of incorrect authentication attempts, it cannot eliminate the risk presented by weak authentication."
So it's rate limiting for logins, not a firewall and not a fix for a weak password. On a typical blog VPS it's still worth the fifteen minutes: it cuts the password guessing against SSH and wp-login.php down to a trickle and keeps your logs readable.
Install it on Ubuntu
sudo apt update
sudo apt install fail2ban
sudo systemctl status fail2ban
On Ubuntu 24.04, make sure you're on the updated package. The first 24.04 build failed to start under Python 3.12 (bug #2055114); it was fixed in 1.0.2-3ubuntu0.1. apt policy fail2ban shows which version you have. If systemctl status says active (running), you're fine.
jail.local, not jail.conf
Never edit /etc/fail2ban/jail.conf. Package upgrades replace it. The jail.conf man page gives the reading order: jail.conf, then jail.d/*.conf, then jail.local, then jail.d/*.local, and "Settings in the file parsed later take precedence over identical entries in previously parsed files." In .local files you "specify only the settings you would like to change".
Ubuntu already ships one override, /etc/fail2ban/jail.d/defaults-debian.conf. On 24.04 it contains (package source):
[DEFAULT]
banaction = nftables
banaction_allports = nftables[type=allports]
backend = systemd

[sshd]
enabled = true
Two things follow from that. The SSH jail is on as soon as you install, reading the systemd journal, so it works even on servers without /var/log/auth.log. And every jail inherits backend = systemd unless it says otherwise, which matters for the WordPress jail below.
Create /etc/fail2ban/jail.local with your defaults:
[DEFAULT]
bantime  = 1h
findtime = 10m
maxretry = 5
ignoreip = 127.0.0.1/8 ::1 198.51.100.7
maxretry is the number of failures "that have to occur in the last findtime seconds to ban the IP", and bantime is how long the ban lasts. Replace 198.51.100.7 with your own static IP if you have one. ignoreip is the "list of IPs not to ban", and it's the easiest way not to lock yourself out. If your home IP changes, leave it out and rely on unbanning (below).
Check the SSH jail
sudo fail2ban-client status sshd
Status for the jail: sshd
|- Filter
|  |- Currently failed:	3
|  |- Total failed:	214
|  `- Journal matches:	_SYSTEMD_UNIT=sshd.service + _COMM=sshd
`- Actions
   |- Currently banned:	4
   |- Total banned:	19
   `- Banned IP list:	192.0.2.41 192.0.2.88 198.51.100.200 203.0.113.77
If you already turned SSH passwords off (see securing SSH and UFW on a new VPS), these bans mostly reduce noise; the guesses couldn't succeed anyway. If passwords are still on, this jail is doing real work, and turning passwords off is the bigger fix.
A jail for wp-login.php
Fail2ban doesn't ship a WordPress filter, so you write a small one. The idea: count POST requests to wp-login.php in the web server's access log.
First see what a failed login looks like in your own log. Log in with a wrong password, then:
sudo tail -n 3 /var/log/nginx/access.log
203.0.113.25 - - [07/Oct/2026:09:14:02 +0000] "POST /wp-login.php HTTP/2.0" 200 4521 "https://example.com/wp-login.php" "Mozilla/5.0 ..."
In a stock WordPress, a failed login shows the form again with a 200, and a successful one redirects with a 302. Check that yours behaves the same (a security plugin or a custom login page can change it), because the filter relies on it.
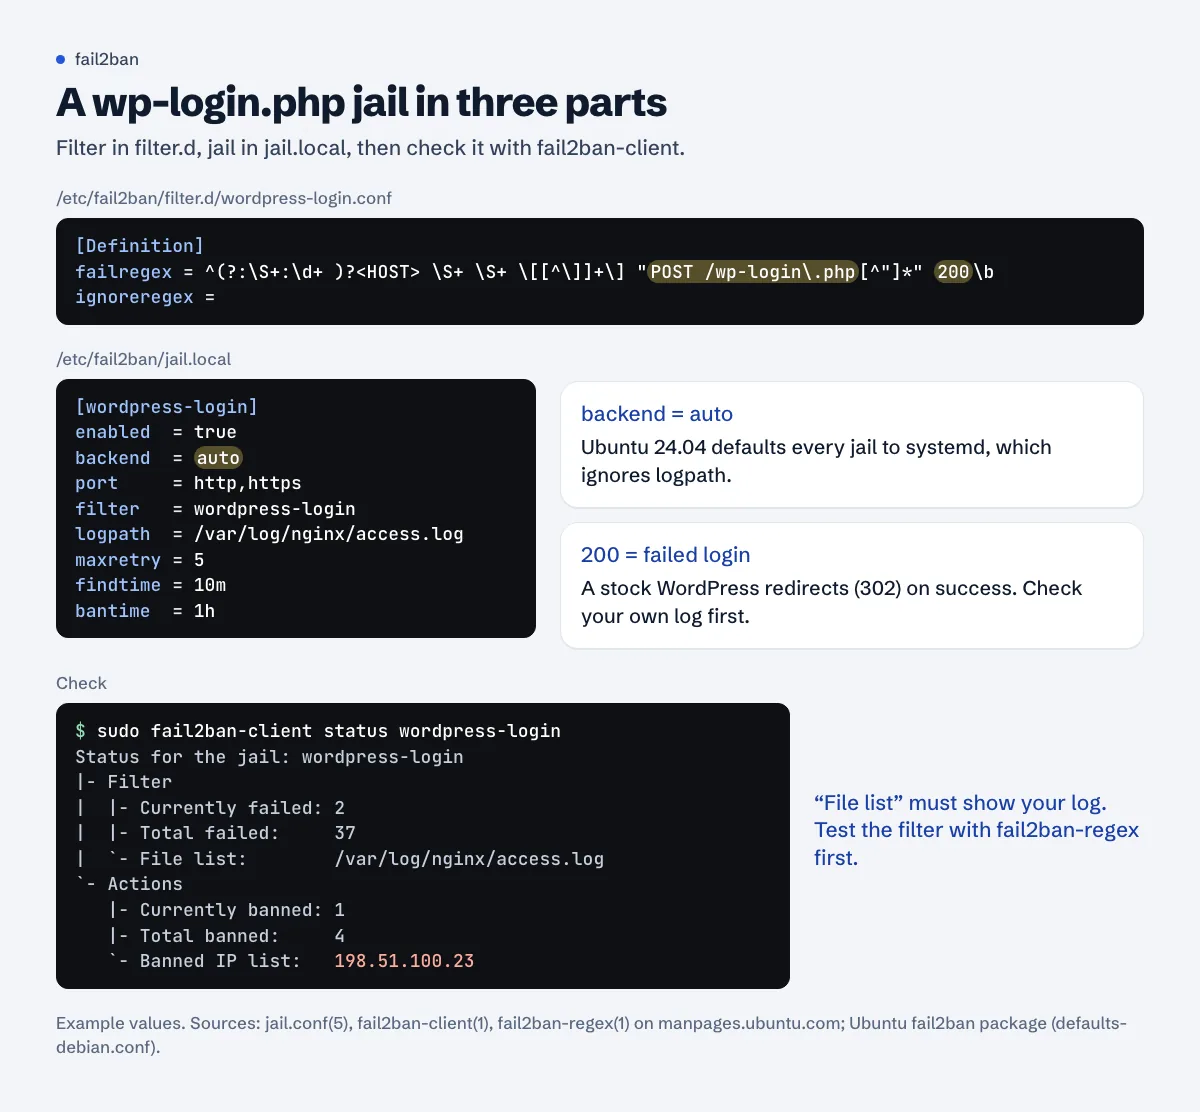
backend = auto: without it, Ubuntu 24.04's default makes the jail ignore your log file.The filter, /etc/fail2ban/filter.d/wordpress-login.conf:
[Definition]
failregex = ^(?:\S+:\d+ )?<HOST> \S+ \S+ \[[^\]]+\] "POST /wp-login\.php[^"]*" 200\b
ignoreregex =
<HOST> is fail2ban's placeholder for the client address. The optional (?:\S+:\d+ )? at the start covers Apache's other_vhosts_access.log, where every line starts with example.com:443. Nginx's and Apache's default combined format both put the IP first, so the same filter works for either.
The jail, added to /etc/fail2ban/jail.local:
[wordpress-login]
enabled  = true
backend  = auto
port     = http,https
filter   = wordpress-login
logpath  = /var/log/nginx/access.log
maxretry = 5
findtime = 10m
bantime  = 1h
backend = auto is the line people miss. Ubuntu 24.04 sets backend = systemd for every jail, and per the man page, with the systemd backend "Specifying logpath is not valid for this backend and instead utilises journalmatch". Your nginx log isn't in the journal, so the jail would start, read nothing and never ban. For Apache, use logpath = /var/log/apache2/access.log (add /var/log/apache2/other_vhosts_access.log on its own line if your sites log there). Several nginx sites with their own logs: logpath = /var/log/nginx/*access.log.
Test the filter against the real log before you trust it (fail2ban-regex):
sudo fail2ban-regex /var/log/nginx/access.log /etc/fail2ban/filter.d/wordpress-login.conf
Near the end it prints Lines: N lines, 0 ignored, X matched. If X is 0 and you know there were failed logins, the log format doesn't match; compare one line with the regex. Then load it:
sudo fail2ban-client reload
sudo fail2ban-client status wordpress-login
What about xmlrpc.php? It answers 200 to failed and successful calls alike, so a filter can only count requests, and the Jetpack connection or the WordPress mobile app would count too. If you don't use either, blocking xmlrpc.php at the web server is simpler than a jail.
Behind Cloudflare or another proxy
If your site sits behind Cloudflare, a server-side ban goes wrong one of two ways. Without real-IP logging, the access log shows Cloudflare's addresses, so the jail bans Cloudflare and cuts off real visitors who come through that edge. With real-IP logging, the jail bans the right address, but the packets still arrive from Cloudflare, so the firewall rule never matches. Neither helps. Behind a proxy, put login rate limiting at the proxy, and if you run fail2ban anyway, leave the WordPress jail off.
Unban yourself, and avoid banning yourself again
sudo fail2ban-client banned
sudo fail2ban-client set wordpress-login unbanip 198.51.100.7
sudo fail2ban-client unban 198.51.100.7
The first shows every jail with its banned IPs. The second removes one IP from one jail. The third, per the fail2ban-client man page, unbans it "in all jails and database". If you're locked out of SSH, run these from your provider's web console or from another network (a phone hotspot works).
To stop it happening again, add your IP to ignoreip in jail.local and reload. ignoreself is on by default ("the banning of own IP addresses should be prevented"), which covers the server's own addresses, not yours.
What fail2ban won't do
- It only reacts to lines in a log. If the failure isn't logged, or the filter doesn't match, nothing happens.
- A botnet that tries two passwords each from ten thousand addresses stays under any sensible
maxretry. - It doesn't stop a correct password, a stolen session or an exploit in a plugin. Keys for SSH, strong passwords and two-factor login for WordPress, and updates do that.
- It isn't a firewall. It adds and removes entries in one. You still want default-deny with only the ports you need (the SSH and UFW guide covers that).
If a site was already compromised, a jail won't clean it up; the hacked site guide covers the cleanup order.
See whether it's working
The Approvalens server agent shows whether fail2ban is running and how many addresses it has banned, and it counts failed SSH logins when you install it with --auth-log.
FAQ
Should I edit jail.conf?
No. Put your changes in /etc/fail2ban/jail.local or a file in jail.d/ ending in .local. Upgrades replace jail.conf, and .local files are read after it, so their values win.
Why does my WordPress jail never ban anyone?
Usually one of three things: the backend is systemd (Ubuntu 24.04's default), so logpath is ignored; the filter doesn't match your log format (test with fail2ban-regex); or the log shows a proxy's IP instead of the visitor's.
Does fail2ban work with ufw?
Yes. On Ubuntu 24.04 it bans through nftables (banaction = nftables in the Debian defaults) and ufw keeps managing its own rules. Check bans with fail2ban-client status <jail> rather than ufw status, which won't list them.
How long should bans last?
There's no official recommendation. An hour stops a run of guesses without punishing someone who mistyped a password for long; repeat offenders come back either way. Raise bantime if the same addresses keep returning.
Spotted something out of date or wrong? Tell us and we'll correct it.
Read this guide in Turkish →Free scan
Check your own site
The free scan reads the first 50 pages and shows your score and every problem it finds.